Tortilla Española.

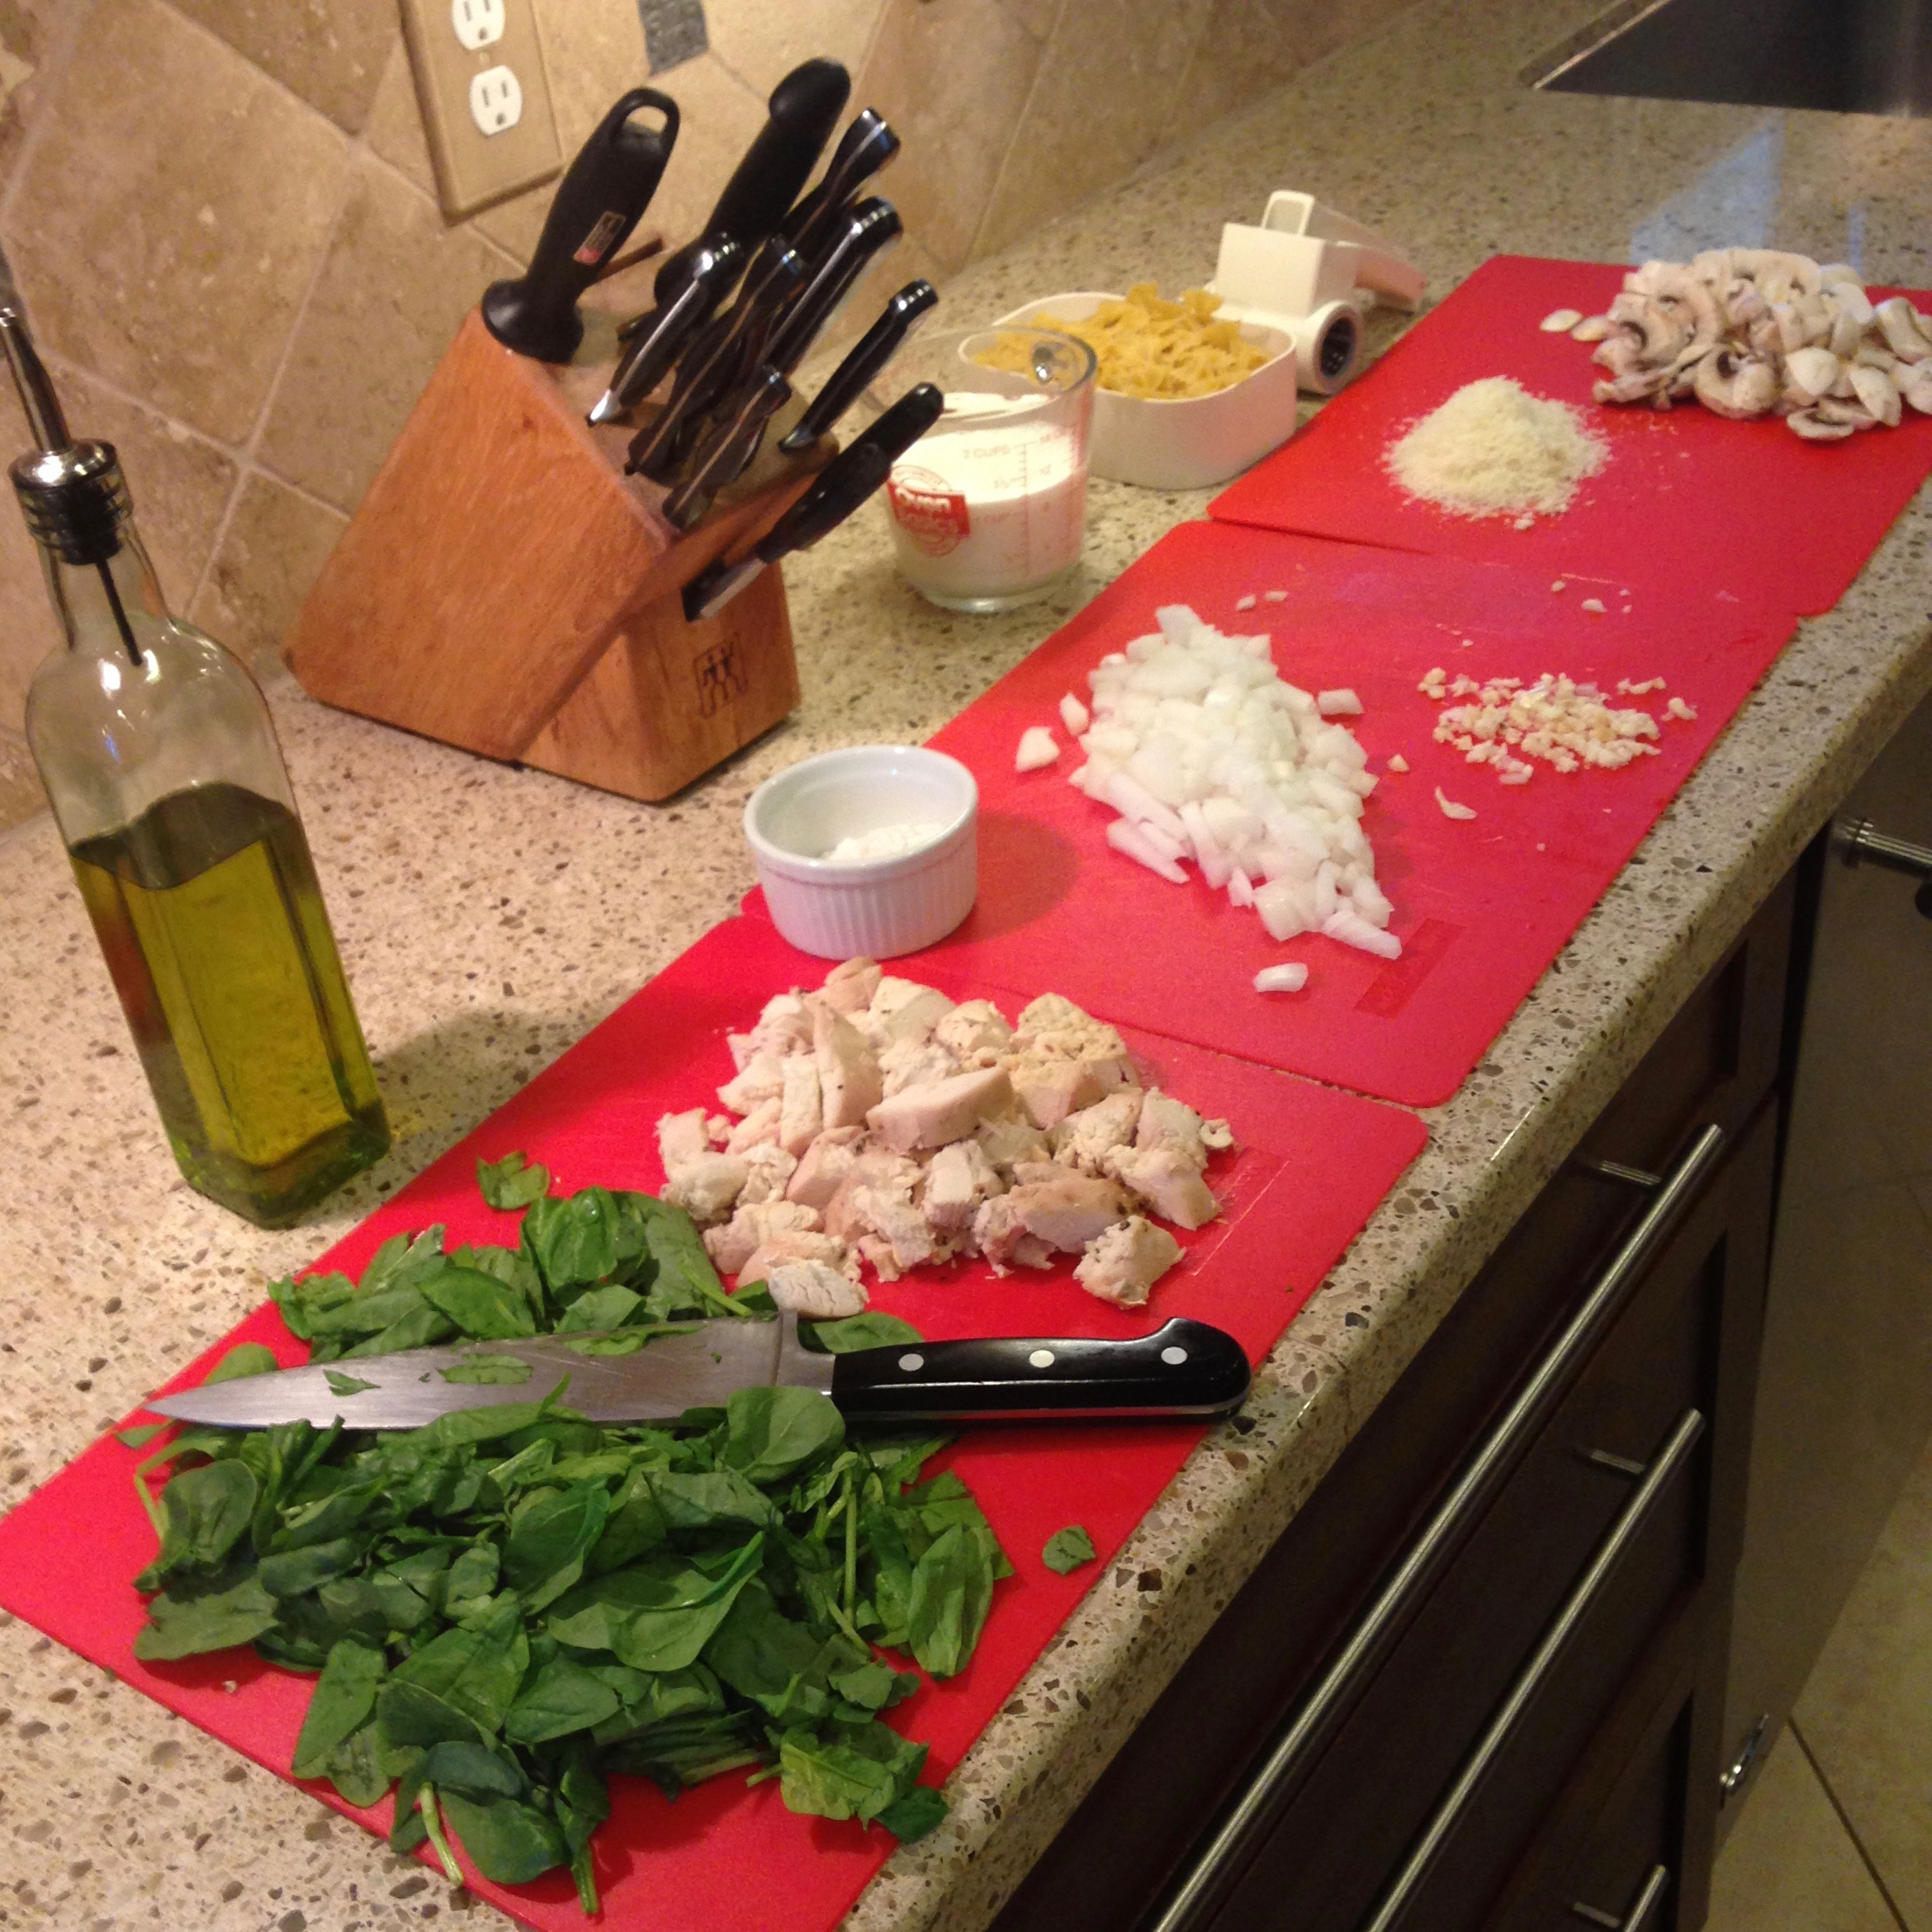
Monte and I threw a party over the Christmas holidays. We got a leg of Jamón Serrano to get things started, and so we made tapas the theme for the rest of the nibblies that we served.

A mainstay in any tapas bar in Spain is the Tortilla Española, a traditional dish made with eggs and potatoes, with a little onion in most cases. When I lived in Spain, I remember spending a day learning how to cook it with my friend Conchita. I’ve made it a few times over the years. But it has been a very, very long time since I tried to again.

I made a practice one earlier in the week, to make sure I could still do it 🙂 That turned out ok, so I made a few more the day before the party. I thought they turned out great, so I’ll share the recipe here.

Ingredients:

The biggest mystery for me was getting the correct amount of ingredients for the specific skillet size I had at my disposal. In my case, it was a 10″ skillet. So the ingredient amounts here are for making a tortilla in a skillet of that size.

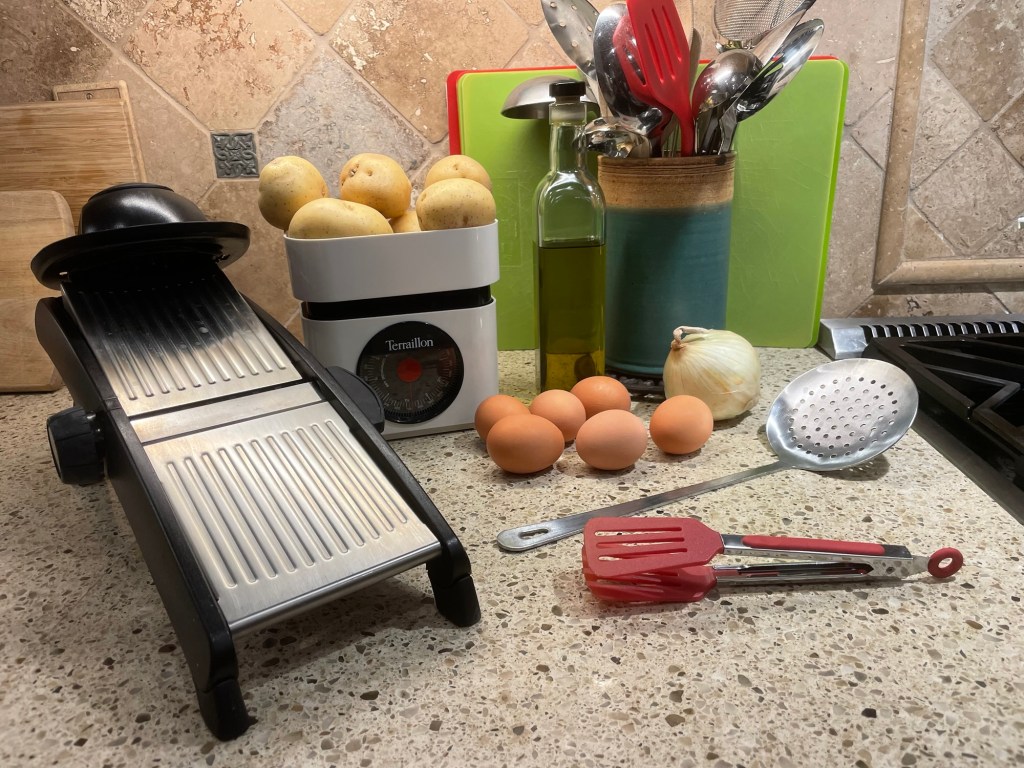
Potatoes: I swear by golden potatoes for pretty much any kind of potato dish I make – other than baked potatoes, that is, for which russets are the best. So this means yukon gold, Idaho gold, etc. The golden potatoes I found were small to medium-sized, as opposed to large. I found that starting with about 1.5 pounds of golden potatoes was more than enough for one tortilla and my 10″ skillet. This ended up being about 6 of my smallish gold potatoes, peeled and sliced thin.

Eggs: 6 large eggs worked nicely.

Onion: Sweet onions are my preferred variety. I used half of a medium-sized sweet onion, sliced thin.

Olive oil: You’ll need 1.5- 2 cups of Extra Virgin Olive Oil. You’ll know you have the right amount if it just covers the potatoes while they are cooking.

Salt: I like to use kosher salt. I didn’t measure the salt, but added it along the way as noted.

Kitchen Tools:

It’s important to make sure you have all the kitchen equipment that you’ll need beforehand (in addition to a potato peeler, knives, etc). Here’s a summary of what I used:

– Two 10″ skillets, one without non-stick (for the cooking of the onions, and the preparation of the potatoes) and one with non-stick (for the actual cooking of the tortilla after all the ingredients have been prepared). You can probably get away with one, but if you plan to make more than one tortilla, having two skillets allows you to overlap some steps.

– A mesh strainer and bowl to drain oil from the cooked potatoes after cooking them. You can reuse the strained oil if cooking more than one tortilla.

– A large bowl to hold the combined egg, potato, and onion mixture before the final cooking step.

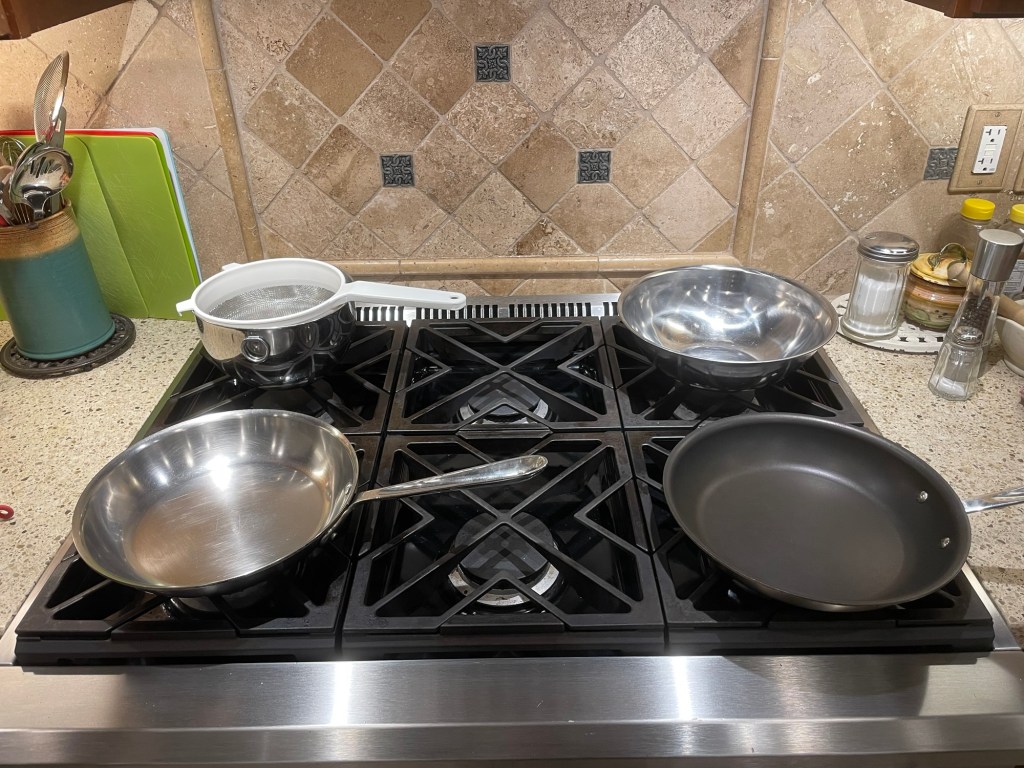
– A big, flat metal scoop with holes to transfer the cooked potato slices from the oil to the strainer. This is because you want to keep the potatoes flat when transferring them, or they will break up into small pieces, which you should try to avoid.

– A mandolin for slicing potatoes thin (I used the 3mm setting).

– A wide-ended set of tongs that can be used to grab the potatoes as they are cooking in the oil and flip them in place, for even cooking. These are the red tongs in my photo below. I wish I had something bigger/better, but these silicon spatula tongs worked ok for the task.

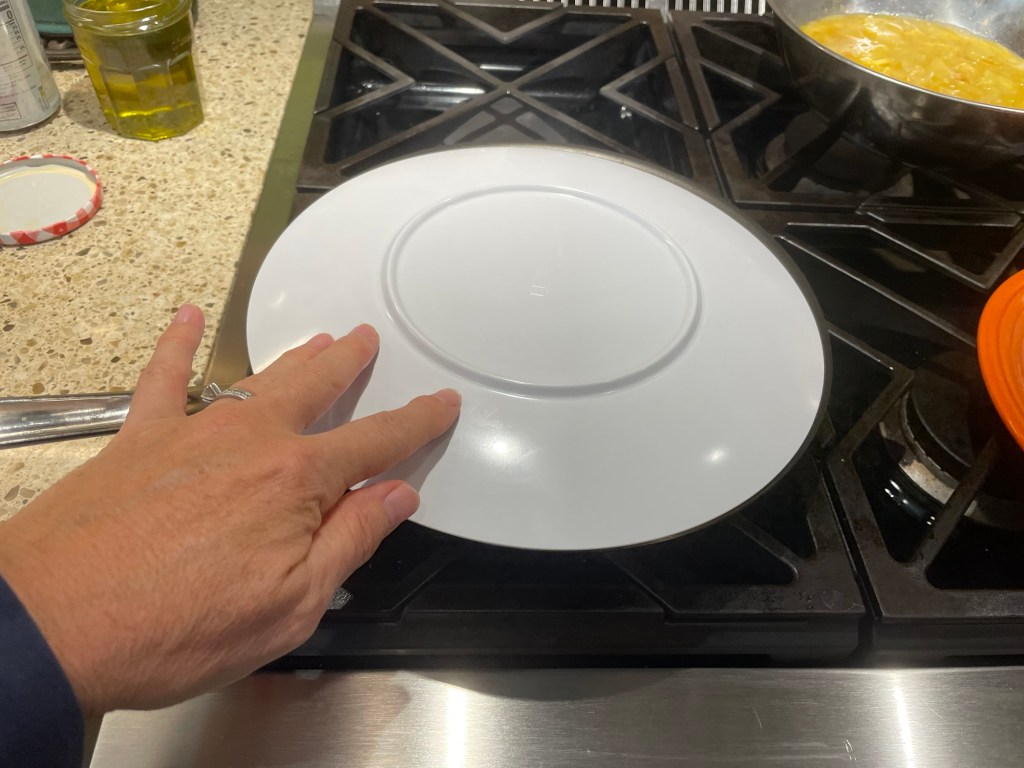
– A mostly flat plate, a little bigger than the top of your skillet, used to flip the tortilla. You don’t want a lip on the edge of the plate, as you want to be able to slide the tortilla from plate to pan easily.

Making the tortilla:

Makes 1 tortilla. Cooking time… more than you think. Probably about 1.5 hours overall, if you’re as slow as I am.

  • 1 1/2 lbs gold potatoes (weight before peeling), then peeled, and sliced 3mm (~ 1/8”) thin on a mandolin.
  • 6 large eggs
  • 1/2 medium sweet onion, sliced thin
  • 1 1/2 – 2 cups extra virgin olive oil

Peel potatoes, soak in a bowl of water for 5-10 mins before slicing.

Slice potatoes 3mm thin on a mandolin. Soak again in a bowl of water for 5-10 minutes after slicing. I like to think the soaking removes some starch, yielding more even cooking and a smoother texture. But who knows. 🙂

This next step may seem a little odd, but it’s important to dry the potatoes before cooking them in the hot oil. Lay out potatoes and pat both sides dry. Then toss with several pinches of kosher salt and set aside.

In a separate bowl, mix the 6 eggs, adding a pinch of kosher salt. Set aside.

Slice onion thin.

Saute sliced onion in 1 Tbsp of olive oil, until soft and caramelized. Set aside. When cool, stir the onions into the egg mixture. Set aside

Add about 1 1/2 cups of olive oil into skillet, and heat on medium-low until oil is shimmery, but not boiling. We are not frying the potatoes in the oil, we are poaching them til they are tender. When the oil is hot, add a slice or two of potato to see if the temperature is right. You don’t want it to fry like a McDonald’s french fry. Sizzle is ok. If it looks right, add the potatoes. Make sure that you have plenty of room above the potatoes in the skillet so as to not overflow the oil when flipping the potatoes. If not, you probably have too many potatoes. Add oil, if necessary, to cover the top of the potatoes.

Cook the potatoes til soft in the oil for about 25 minutes, carefully flipping the potatoes to ensure even cooking. You want them to be soft when you pierce them with a knife, but not crumbly. Think of the texture of scalloped potatoes when cooked – soft to the tooth, but still with some body.

When you think you’re there, carefully scoop the potatoes out little by little (using the flat scoop) into the mesh strainer, using a bowl to capture the strained oil. The potatoes need to sit til they are cool enough to add to the egg mixture without cooking the eggs (around 10 minutes)

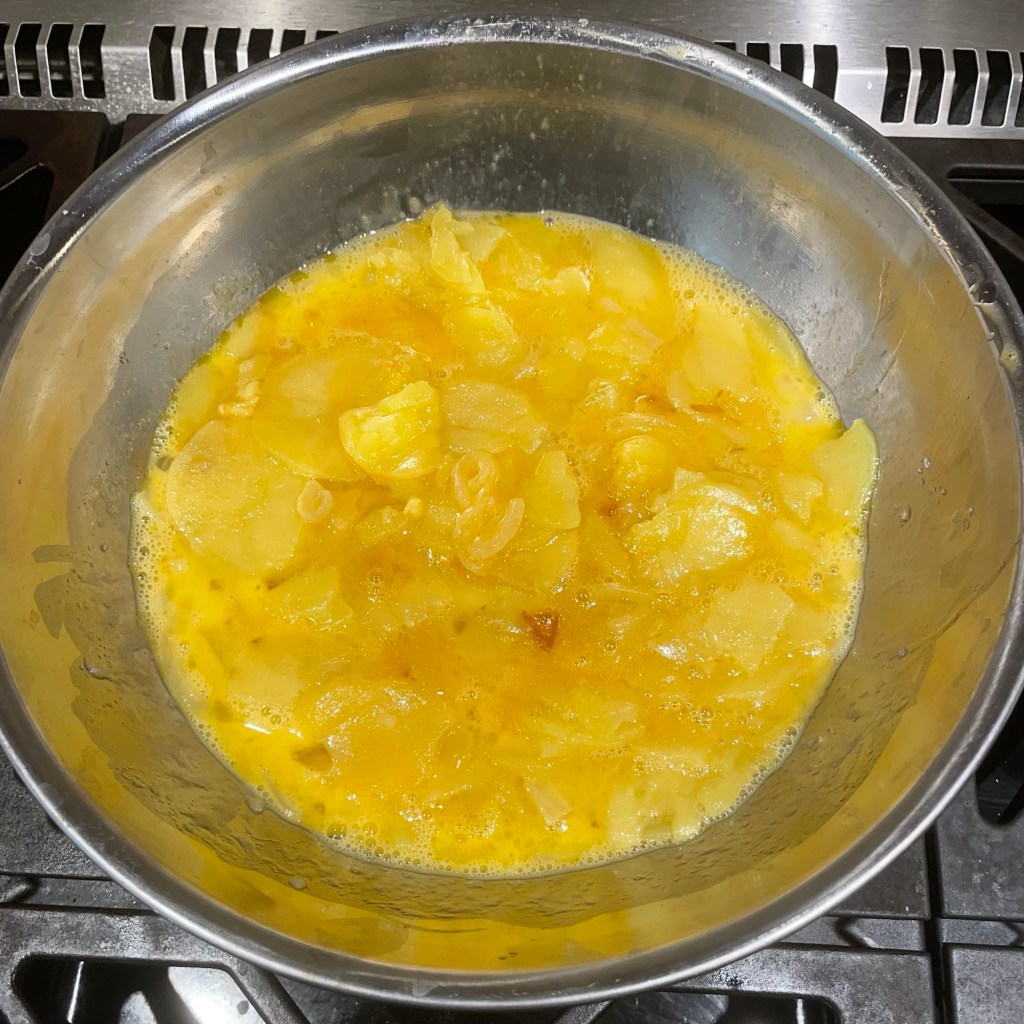
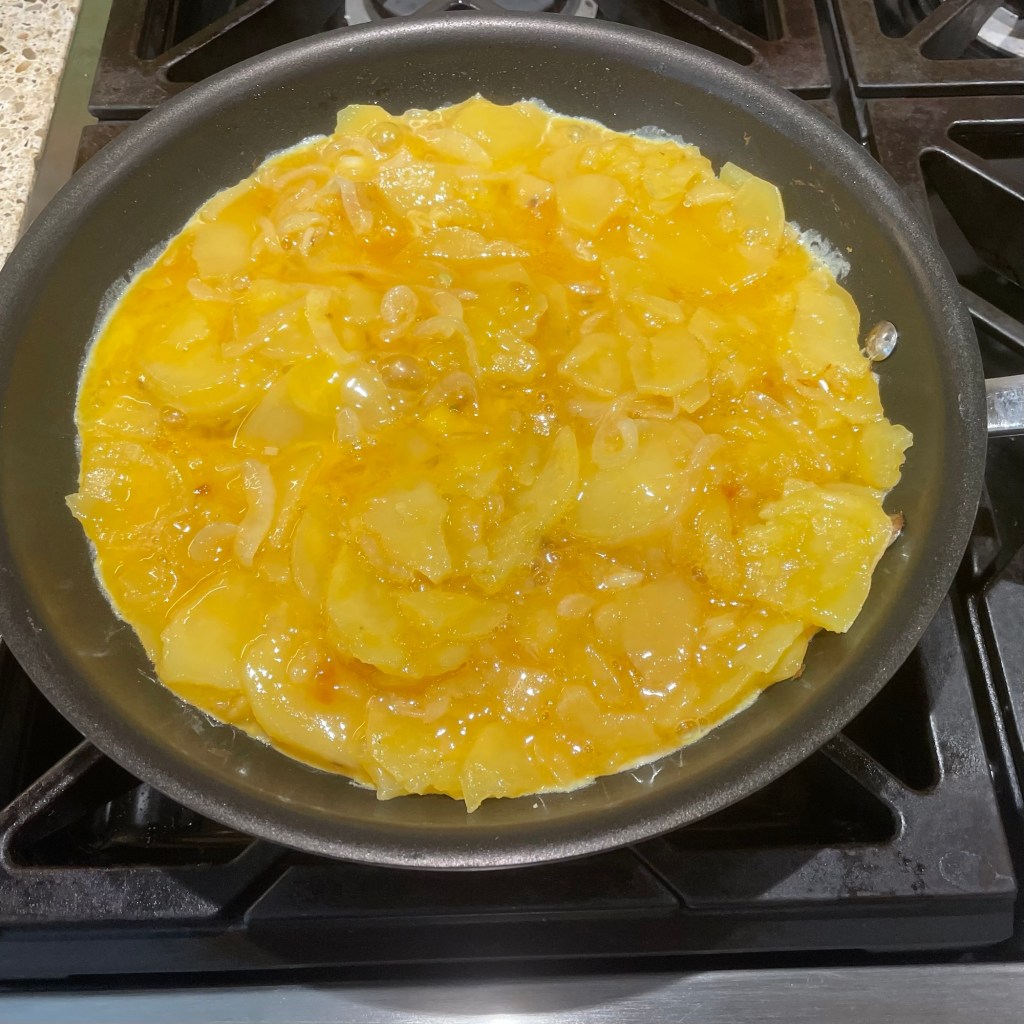
When the potatoes are cool enough to touch, you can add them to the egg and onion mixture. Gently combine them. Then the combined egg, potato, and onion mixture must sit for 15 minutes. This is where the magic happens.

The egg, cooked potatoes, and onion mixture

Heat a non-stick skillet with a teaspoon or two of olive oil on medium-low heat. When the pan is hot, add the combined egg, potato, and onion mixture into the pan. Cook for 6-8 minutes. You can use a spatula to round the edges of the tortilla as it cooks.

What this recipe’s amount of ingredients looks like in the 10″ skillet

After 6-8 minutes, see if you can insert a spatula under the tortilla to see the color of the bottom. If it is not browned a little it needs more time. If it is golden and a little browned, you can flip it to the other side. It can be a little runny on the top when you flip it. But it should be mostly cooked from the bottom up.

To flip the tortilla, place the flat plate upside down on top of the hot skillet. Using hot pads, grab both sides of the skillet and the plate at the same time, and invert the whole thing. Set the inverted pan and plate on the counter. Lift the pan and place it back on the stove to continue cooking the other side. Then gently slide the tortilla back into the skillet with the half-cooked side up. You may have a little bit of loose egg and potato left on the plate.

The tortilla cooking side 2 after flipping.

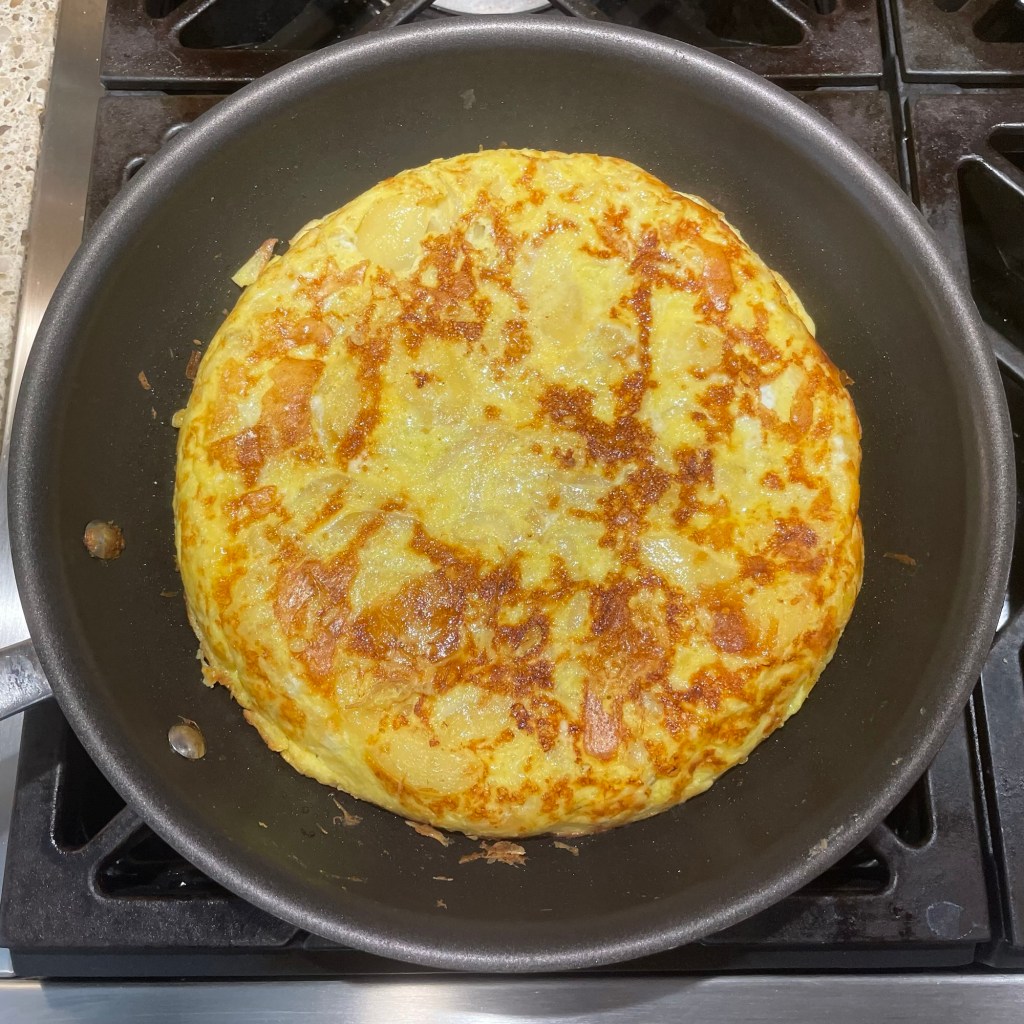
Cook the other side of the tortilla for another 6-8 minutes til firm and similarly browned.

When done, use a clean plate and use the technique above to flip the cooked tortilla onto it.

Et voila! The tortilla can be served hot, or at room temperature. Cooking it a day before you need it is just fine. Just let it cool before refrigerating. And then remove from the refrigerator a little while before serving so it can come up to room temperature.

I wish I had taken more of the earlier steps. When I make another one, I’ll try to remember to take additional. If so, I’ll come back here and add them.

Til then, ¡Buen Provecho!

Flying by.

Wow, that was fast. January and February flew by – only 8 months til Halloween. 🎃

After the brief ice age a few weeks ago, our temps are in the 80s here. Seems strange when the latest arctic front is hitting another part of the country. But I’ll enjoy it because we’ll be back in the 100s in no time.

Speaking of ice storms, our wall of broken tree limbs were thankfully hauled away this week. I can see the street again!

I’ve been craving fish tacos for a week. Last night the universe aligned and I finally made a batch. They’re so delicious. Here’s a link to the recipe I start with. Or you can just google ‘best fish tacos’ and it’s the top result. They’re that good. The sauce is amazing. And the cotija cheese makes them muy auténtico. I like to use mixed corn/flour tortillas, which Doray turned me on to years ago. They’re sold by H‑E‑B here in Texas as Mixla tortillas. They tend to hold together better than plain corn tortillas.

Yum. See, now you are craving them.

What the dukkah?!

Colleen turned me on to a new taste treat, an Egyptian-heritage nut and spice blend. Apparently Trader Joe’s sells some. Instead of running out to the store, I asked Google for help finding a recipe and picked this one because I had all the ingredients for it. I just made some and I like it. You can serve it in another dipping dish alongside bread and olive oil, pita and hummus, or veggies and hummus, or whatever else floats your boat.

Click through here to see the recipe as I found it. I used almonds instead of hazelnuts.

Biscotti on my mind.

I will do a bit more baking before the temps start hitting the triple digits again in Austin, at which point I am loathe to turn on the oven. I still have a couple of months.

I made almond biscotti yesterday (that recipe was posted in an old Sheila365 post here). Today I made a batch of chocolate biscotti. I love to dip one of these in my coffee in the morning.

Chocolate Biscotti Recipe (Preheat oven to350 degree F, makes about 2 dozen)

2 cups all-purpose flour
1 cup sugar
1 cup sliced almonds
1/4 cup unsweetened cocoa powder
1/2 tsp baking powder
1/2 tsp baking soda
1/2 tsp salt
1/2 tsp ground cinnamon


2 tsp water
1 tsp vanilla extract
2 large eggs
1 large egg white

Combine first 8 (dry) ingredients in large bowl.

Mix next 4 (wet) ingredients in small bowl with a fork.

Add wet to dry ingredients and stir until all is crumbly but moist. Then use your sparkling clean hands to massage and knead the mixture in the large bowl until it holds together in one moist loaf.

Spray a baking sheet with non-stick spray and place the dough on the baking sheet. Shape with your hands into a flat loaf, about 3/4″ high and 4-5″ wide. I like to square the ends so each piece is approximately the same size.

Place in a 350 degree Fahrenheit oven for 30 mins. Then remove loaf and place on cooling rack for 10 minutes. Reduce oven temp to 325 degrees Fahrenheit. After cooling, slice the loaf into individual biscotti pieces about 1/2″ wide. Place each biscotti on its side on the baking sheet.

Bake in 325 oven for 10 minutes, then turn each biscotti piece and repeat for another 10 minutes.

Cool on rack, and enjoy!

If you care to count your calories, you may like to use a recipe calculator to estimate the calories per serving for your favoite recipes. I use the one at VeryWellFit.com. I plugged in the details for this recipe (assumes 24 pieces) and it says one biscotti is about 100 calories.

Enjoy!

Full enough.

I grilled pork tenderloin for dinner tonight. Over charcoal. Marinated in Allegro. Indirect. 21 mins, ~7 mins per side. Measure with meat thermometer to 145 degrees F. AMAZING.

As I waited for the meat to grill, I snapped this photo of the not-quite-full moon over our winter foliage.

Christmas sunset.

I grilled a delicious cedar plank salmon for Christmas dinner, recipe below. Julie joined us and stirred up a tasty risotto dinner. Nom nom. Sunset was fleeting, but lovely.

Grilled cedar-plank salmon:

  • soak a cedar plank in water for several hours ahead of grilling
  • slather a boneless salmon fillet with olive oil, then sprinkle generously with kosher salt, freshly ground black pepper, and a dash of garlic powder
  • place fillet, skin side down on the pre-soaked cedar plank
  • place cedar plank & salmon over direct coals for 20-30 minutes

Enjoy!

3-way, baby!

I was introduced to Cincinnati Chili late in life, at a Skyline Chili restaurant while visiting southeastern Indiana and Ohio. Better late than ever, though! I was hooked.

I’ve been trying to make the quarantine-induced endless stream of home-cooked meals interesting, so I dusted off a recipe from our Joy of Cooking and made it for dinner yesterday. It was delicious! I might make it every week. 🙂

If you’ve never been treated to the savory goodness of the blended spices in its sauce, you are missing out. Check your spice cabinet inventory and get cooking!

Here’s how to make you some!

Cincinnati Chili (adapted from Joy of Cooking)

Makes 3 servings

Bring 2 cups water to a boil in a large pot

Add:
1 lb ground beef sirloin

Stir until separated, and reduce heat to a simmer.

Add:

1 medium onion, finely chopped
3 garlic cloves, crushed
1 8 ounce can tomato sauce
1 T apple cider vinegar
1 T Worcestershire sauce

Stir in:

5 whole black peppercorns, ground
4 whole allspice berries, ground
1/4 tsp ground cloves
1 large bay leaf
1 tsp salt
1 tsp ground cinnamon
1/2 tsp ground red pepper
1/2 tsp ground cumin
1⁄4 ounce unsweetened chocolate, grated

Bring again to a boil, then reduce the heat to a simmer and cook covered for 2 1⁄2 hours. Refrigerate overnight and reheat, or eat it right away! Don’t forget to discard that bay leaf.

For a 2-Way, serve over cooked thin spaghetti (2 oz of dry pasta per serving).
For a 3-Way, which is my favorite, add a pile of finely shredded cheddar cheese.
For a 4-Way, add chopped onions on top of the cheese.
For a 5-Way, add cooked red kidney beans.

Sláinte!

I made Monte a chocolate Guinness cake for his birthday (recipe here).  I put a little chocolate powder in the icing (link for that is also in the recipe for the cake) so it would be tan colored instead of white.  You know, so I could put a little beer foam on top along with the signature shamrock  🙂

Happy Birthday!

IMG_4064

Dinner and a movie.

Yesterday we helped Julie move into her new apartment.  Then she joined us for dinner.  I shouldn’t have, but I made a very decadent pasta dish, and we pigged out while watching The Princess Bride (for probably the tenth time).  If you are craving a high-calorie, savory, down-home, soul-food kind of pasta dish.  This is the one for you.

IMG_3616

Sausage & Basil Baked Pasta

  • 1 small sweet onion, diced
  • 2 cloves garlic, minced
  • 8 oz dry penne or ziti pasta (makes about 3 cups cooked)
  • 1 lb fresh mild italian ground sausage
  • 24 oz jar of tomato & basil sauce
  • 2 eggs
  • 15 oz carton of ricotta cheese
  • 2 c shredded mozzarella cheese
  • 1/2 c shredded parmesan cheese
  • 1/4 c fresh basil, chopped

Boil pasta per package directions, drain and set aside.

In medium saucepan, cook & crumble italian sausage.  Drain off fat.  Return skillet to heat and add onion & garlic to sausage.  Saute until onion is soft.  Add tomato sauce, heat through and set aside.

In large bowl, combine ricotta cheese, parmesan cheese, eggs, and half of the mozzarella.  Fold in the cooked pasta to combine well with cheese mixture.

Into a 13×19 pan, add half of the pasta & cheese mixture, spread evenly.  Add half the sausage & tomato sauce mixture.  Layer again with remaining cheese and sauce.

Cover and bake in 350 degree oven for 20 minutes, until bubbly.

Remove cover, add remaining mozzarella cheese and place back in oven for 5-10 minutes, until cheese is melted.

Sprinkle with chopped basil and serve.    Makes enough to feed an army.


The birds and the bees.

The hummingbird feeders are getting quite a lot of traffic these days.  Between the bees, the hummers and the finches, they’ll empty one of these in a day.   I had just refilled this feeder and by the time I got back into the house, these two had already stopped for a drink.

OLYMPUS DIGITAL CAMERA

Hummingbird Nectar
1 part sugar : 4 parts H2O
Bring to a boil for several minutes.
Let cool completely.   You can refrigerate any extra for a week or so.
Probably shouldn’t leave in the feeder for more than a day or two.

Cookies, baked & decorated.

I had a marathon baking session yesterday.   🙂

img_1585

I used a recipe from Southern Living‘s “Christmas at Home” 2009 special issue that I’ve had for years.

Sparkling Sugar Cookies  (made 4-5 dozen medium sized cookies when I made them)

1 cup butter or margarine, softened
1 cup granulated sugar
1 large egg
1 teaspoon vanilla extract
3 cups all-purpose flour
1/8 teaspoon salt
Coarse sparkling sugar sprinkles of your choice

Beat butter at medium speed with an electric mixer until creamy. Gradually add granulated sugar, beating well. Add egg and vanilla, beating well.

Combine flour and salt. Gradually add to butter mixture, beating until blended. Divide dough in half. Cover; chill 1 hour.

Roll each portion of dough to 1⁄8-inch thickness on a lightly floured surface. Cut with desired cookie cutters.  Place on parchment paper lined baking sheets.

Bake at 350° for 12-14 minutes ( 14 worked perfect in my oven)  or until edges of cookies are lightly browned. Cool 1 minute on baking sheets, then remove to wire racks to cool completely.

Add glaze (recipe below) and sprinkles (while glaze is still wet).  Leave flat until completely dry (this took quite a while for me).

Enjoy!

Simple Glaze  (makes about 1 cup)

1 (16-oz.) package powdered sugar
4-6 tablespoons hot water
Liquid food coloring (optional)

Stir together powdered sugar and hot water until smooth. If desired, divide mixture, and tint with food coloring.  Spread on cookies with spatula or dip, whatever works best for you.


Garbage-pail pasta before & after.

Garbage-pail pasta is a quick dinner dish that I throw together using whatever is in the fridge.   Last night’s version featured:

  • leftover chicken breast meat from the day before – diced (8-10 ounces)
  • 1 onion – diced
  • 2 garlic cloves – minced
  • 2 Tbsp olive oil
  • 2 tsp each of kosher salt & ground black pepper
  • 2 cups of mushrooms – sliced
  • 1 Tbsp all-purpose flour
  • 8 ounces of dry bowtie pasta, cooked before it is added to sauce
  • 1 cup of half & half
  • 2 cups of baby spinach – coarsely chopped
  • 2 ounces of grated parmesan cheese

Pre-cook pasta in salted water.   Save the pasta water to use it to thin the cream sauce later, if needed.

I use a 4-5 quart saute pan/pot to make the sauce, so that it is big enough to hold both the sauce and the cooked pasta when it is added later.

Saute onion, garlic and mushrooms in olive oil over medium heat, until soft.   Add in the pre-cooked chicken, salt & pepper, and stir for another few minutes til chicken is warm.  Add flour and stir, to coat meat and veggies (this will help thicken the cream sauce later).

Add half & half and stir until sauce begins to thicken.   Add small amounts of pasta water if sauce gets too thick.  Stir in parmesan and spinach, for a minute or two.  Then turn off heat under sauce.  Add drained, cooked pasta to the sauce and stir.

Before:

img_1111

And after:

img_1113

Not bad.  This dish would easily serve 4.  Next time, I’d add more mushrooms.

Lemony goodness.

During our visit to Seattle, my niece made ice cream sandwiches for dessert.   They were delicious, so I had to try making them when we returned home.

IMG_0905

If you like lemon, and you like ice cream, you must try these.

Lemon Ice Cream Sandwiches (makes 4)

4 or 5 scoops of vanilla ice cream – we used Bluebell Homemade Vanilla, of course
1 Tbsp Dickinson’s lemon curd – or more, to taste
8 belgian butter cookies

Put all ice cream scoops together in a single bowl.  Add lemon curd and stir well.  I used a stiff spatula to blend.  Do this relatively quickly, before ice cream gets too soft.  Place 4 cookies on flat baking sheet.  Spread a scoop of the blended ice cream onto each cookie.   Lightly place another cookie on top of each.  Place in freezer for several hours.


And another.

I’m going to have to learn to tell these guys apart.OLYMPUS DIGITAL CAMERA

Hummingbird Nectar Recipe

  • Mix 4 parts water with 1 part granulated sugar in a saucepan and heat until sugar is dissolved and the mixture reaches a light boil for a minute or two.  Let cool before filling feeders.