I ♥ Kohler.

When we remodeled our house 5 years ago, we put in a beautiful Kohler Simplice faucet (model number K-647-VS) at the big kitchen sink.

I love it.  A few months ago, though, it started leaking water from under the single hot/cold control handle.  There was always a puddle around the faucet.  It drove me NUTS.

Google showed me that Kohler has really great documentation on how to fix this on their web pages here and even a short video here.   And I eventually dug out and read the owner’s manual/guide that came with it  – yes… i keep those things 🙂   I read about the Kohler Faucet lifetime warranty.   You can read the fine print here, but Kohler basically says:  “if the Faucet should leak or drip during normal use, Kohler Co. will, free of charge, mail to the purchaser the cartridge necessary to put the Faucet in good working condition.”   Yes, free.   I can’t believe anyone does that anymore.

So, I called Kohler’s customer service line (1-800-4KOHLER) and described the problem to a real and knowledgeable person and they said with all likelihood it was a bad valve.  They sent me a replacement valve in the mail for free.   It arrived over the weekend, and I installed it.   VOILA problem solved!

I just wanted to give a shout out to a company that still provides great customer service!

Read on for a few comments on what was a little more difficult than described in my experience of changing the control valve.  Good Luck!  My DIY photo:

IMG_7370

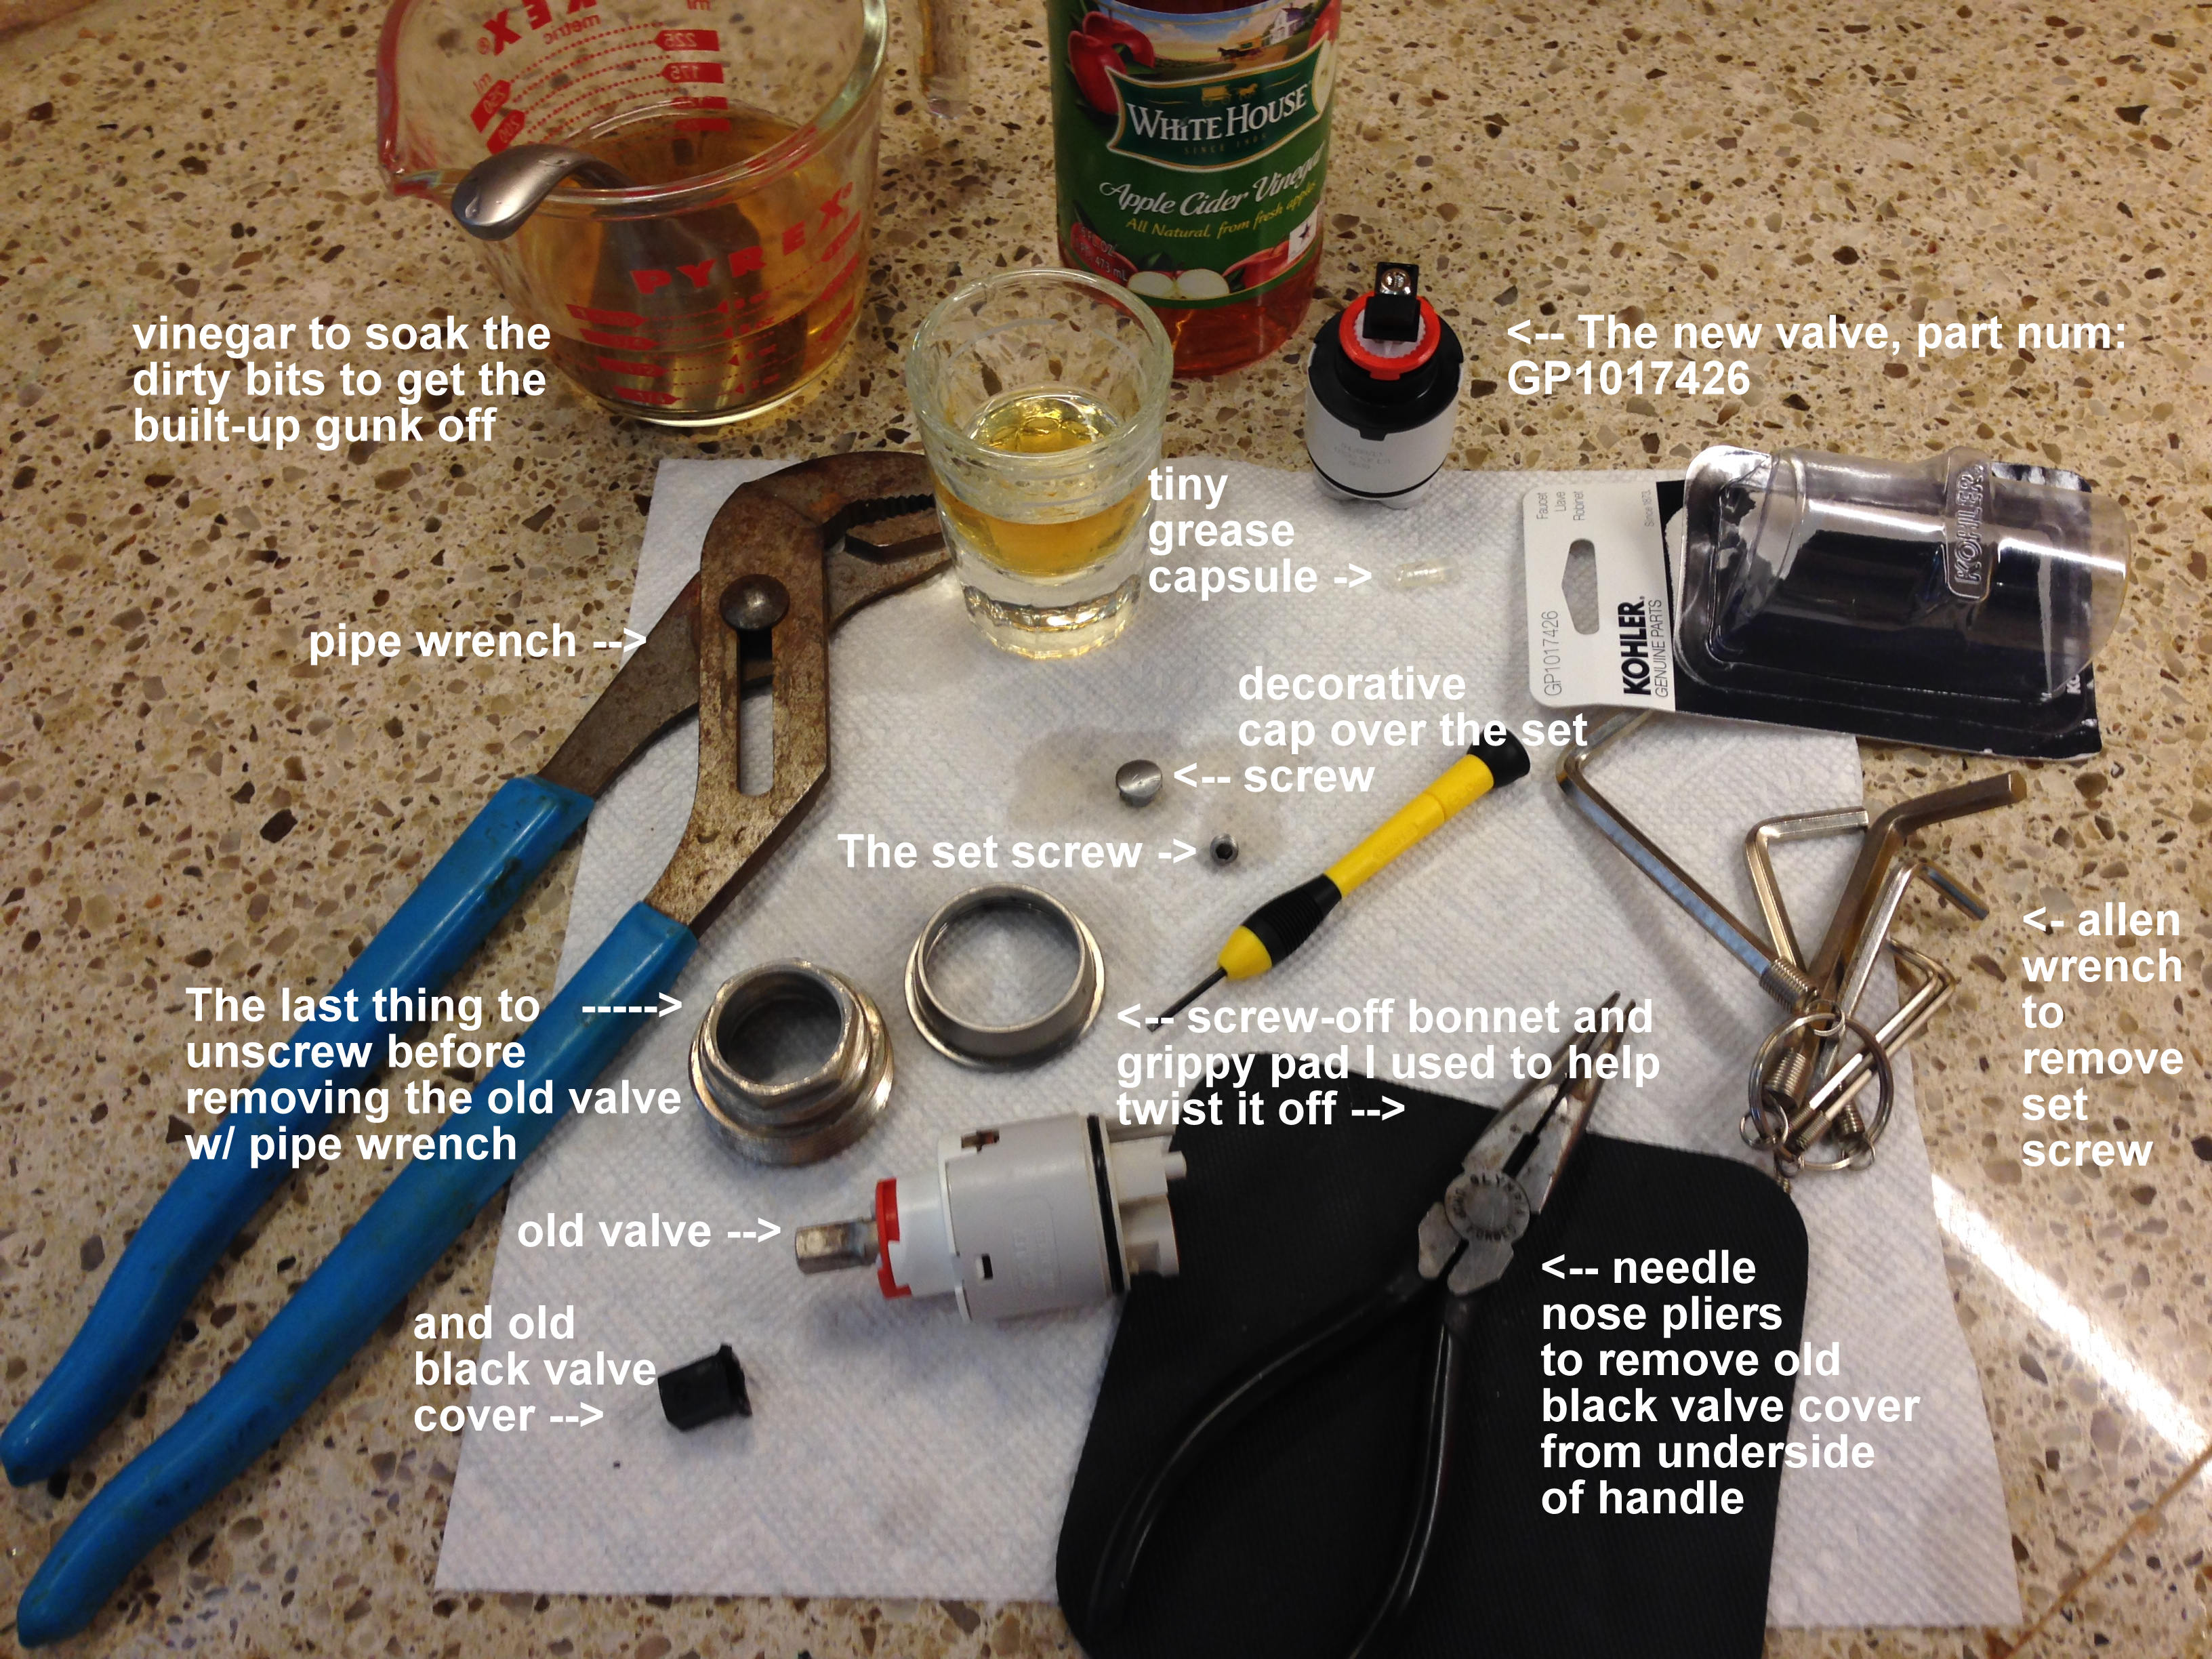
The documentation and video online are pretty much self-explanatory.   There were 2 steps that took a bit more effort than I anticipated.

1) It took a significant amount of effort to get the Hot/Cold water control handle off (after removing the set screw) – more than I was capable of, so I enlisted Monte for that job.  It took a while, but it did come off with a sustained, firm, upward pull.   The problem was the black, plastic sleeve on the valve was stuck in the handle, creating loads of friction.  The new valve comes with a replacement black sleeve, so I had to remove the old one using needle nose pliers after the handle came off.

2) the decorative “bonnet” under the handle was hard to unscrew.  But, I used one of those rubber, grabber pads that helps unscrew the lids from jars.  And with some perseverence, it did the trick.  After those two steps, everything else went as advertised.

The replacement kit came with a teeny capsule of grease, which I spread around the new valve’s o-ring.  The video doesn’t mention that.

Yay KOHLER!

Indie-pendants.

I’ve been playing with beads again.  I’ve gotten it in my head that pendants that can easily slip onto chains would be fun to make and very versatile.   Here are a few I’ve recently made.

Made with (L-R):  turquoise, tiger’s eye, swarovski crystal, and howlite.

20130509-080438.jpg

One more pair.

Sterling filigree balls.

I really don’t intend to re-purpose this blog to be a beading blog, but since it is a photoblog showing various moments from my day…. and since I’ve been thinking about and doing a lot of beading lately..this is what you get.  🙂

This is a pair that I made today, inspired by this pin on pinterest.  The noteworthy thing about this pair is that they are my first attempt at making a wrapped loop at the top of the headpin.  A little rough, but I’ve got plenty of time to practice.

Another piece.

Turquoise ditties
Turquoise ditties

I bought some turquoise stones and some brown round beads a while back.   This morning I pulled out my bead box and strung together this bracelet and earrings.

I have lots to learn about making jewelry.  My loops are basic and unornate.  My strung beads are looser than I would like.  But I’m having fun learning!

Now, if i could just learn how to photograph them properly….  🙂

As for my post yesterday, my friend had the best possible case during her surgery last night, according to her doctors.   Thanks for your prayers.    Now fingers crossed for good news from the lab next week.

We’re off to the lake this afternoon.  Have a good one!

DIY: Jewelry board project.

My lastest project.
My lastest project.

I finished yet another pinterest-inspired project today:  a board for hanging my jewelry.   The inspiration pin can be found here.

Wanna make one, too?  Read on.

I bought an inexpensive corkboard, about 18″ x 24″ or so, from IKEA.   For future reference, you should note the thickness of the board material (not the frame part, but the field part of the bulletin board).   You may need to trim the screws that come with the drawer pull hardware, like I did.  The thickness of my board material was 1/4″.   When the screws were screwed all the way into the hardware, there was 3/4″ of an inch showing.  Which meant I would have to cut off 1/2″ from each screw (with a hacksaw) so that they would fit my board.  You’ll either have to do that, or look for screws that are the right length.

IKEA corkboard
IKEA corkboard

Then I bought some miscellaneous drawer pulls.   I also picked out some hooks and small chain and some push pins.  Yes.  This would have been less expensive if I had this stuff laying around already…

Laying out where the hardware will go.

Then picked out some fabric and ribbon from Joanne’s.

Pretty bits.
Pretty bits.

Cut and hem the non-selvage edges of the material big enough to wrap around the bulletin board leaving several inches.

corkboard4 corkboard5

Sew on ribbon to add some accents.

corkboard6

Put the fabric you’ve just sewn aside.  Now using an awl, poke holes in the corkboard where the screws for where you want each piece of hardware to go.

Poke holes where the drawer pull hardware goes.

Using a drill, with a drill bit no bigger in diameter than the fasteners for the drawer pulls, drill all the way through the corkboard and its backing board.  My corkboard had a thin, fiber board backing.  So, when I drilled through it, it sort of made a hole with rough, fuzzy edges.  After I drilled each hole I scraped away the debris from the front and back of the board around each hole.

corkboard9 corkboard10

It’s a good idea to do a dry run and screw the hardware to the board, to make sure the holes are all in the right places.  If not, make adjustments, then take the hardware off again.

Testing to make sure the holes match the hardware.

Now it’s time to wrap the board in fabric.  I did this using a stapler, into the back of the board.  Wrap the fabric tight, working your way around the board.

The back of the board.

Again, using an awl through each pre-drilled hole in the back of the board, poke a hole through the fabric on the front.  Be careful not to snag your material.  This will allow the screws to go through the fabric without twisting it or tearing it.  Then, place the screws into each hole, through the back of the corkboard, using a screwdriver to turn the screws through the holes you’ve just pierced into the fabric.

corkboard12
Pierce the fabric for each screw-hole, to make way for the screws.
corkboard13
Turn the screws through the back of the board til they are clear of the fabric.

Now you just need to place the hardware over the screws and tighten them down.

I added some chain fastened with push pins on either end – more space to hang earrings.

Voila!

The finished board.
The finished board.

Corked.

Look what I just made!

I was inspired to make this wreath by a do-it-yourself project that I ran across on pinterest (original link here) and pinned it in my “DIY: wannado’s” board a month or so ago.   I immediately knew that I was going to try to make one – not just because I loved the way it looked, but because I have been hoarding corks for 10-15 years (much to monte’s bemusement) just waiting for a project I could use them in.   The hot-pad-trivet-made-out-of-corks projects I usually run across just didn’t do it for me.

I love wreaths, and with Thanksgiving and Christmas around the corner, I knew I’d better get started if I wanted to finish it before the holidays.  I love how it turned out.   Here’s how I did it.

What you’ll need: straw wreath body, straight pins, glue and lots of corks.

I bought an 18″ diameter straw wreath body (from Michael’s) a box of 1 1/4″ dressmaker pins (longer is better) and some craft glue (from Joanne’s).   Then I dug out and dusted off several bags/boxes labeled “corks” from the garage and started sorting.   I didn’t keep track of exactly how many I used, but I’m pretty sure it’s on the order of about 400-500 corks.  I can’t help but do a little math here…. if i estimate that on average I spent $12 a bottle… that means this wreath cost in the neighborhood of about $5000.   (heheheh… sigh)   Anyway, as I was sorting,  I tossed corks that weren’t 100% solid cork.  Many were made up of lots of little pieces of cork molded in the shape of a cork.   I also wanted to mix up the red wine (stained) & white wine corks and mix in a champagne cork every now and then.   So I picked out bunches of them as I went along.

Sort your corks.

Stick a pin into each cork – get a good bite but leave as much of the pin hanging out as you can.

Stick a pin in the end of each cork.

Then put a line of glue on the pin.

Apply glue to the pin to help it bond with the straw wreath form.

Then stick the cork into position by pushing the head end of the pin into the straw wreath form.  I inserted them all at an angle, where one row laid on top of the last one.  Sometimes the pins went into a gap between the straw and didn’t stick well.   So try to make sure you poke the pin through some of the straw when you push them in.   Between the pins and the glue, the corks were surprisingly stable in the wreath when finished.

Push the head end of the pin into the wreath form at an angle.

I must admit that it was a little daunting getting started, but after the first row or two, it really was easy and went a lot quicker than I expected.  Here is a close up of how the layering turned out.  Some of the corks had years printed on the end or a unique logo, which added a nice touch to the detail.

Mix ’em up.

I hastily added the ribbon as an afterthought, to dress it up for the holidays.   I know the ribbon looks a bit hokey, but I wanted to hang it up on the door to take a picture, so I was in a hurry.   But you get the idea.  After Christmas I’ll remove the ribbon and hang it on a wall in the house dining room or kitchen.

Start saving those corks!

La chaise de bistrot du bubbly.

Little bistro chair made out of champagne cage.

Yay, Friday!  Julie and I treated ourselves to a pedicure after work / class.  Then Indian for dinner with Monte.  Then back home for a movie on pay per view…Moonrise Kingdom.  Enjoyed it!

We shared a bottle of bubbly, and made this cute little bistro chair out of the cage on the champagne bottle.  I saw this online a while back which gave me the idea (and also shows you how to make one, if you want to try it yourself).  We ought to have a couple dozen made by New Year’s Day.  🙂

Table for one!

Pretty dangles.

My first attempt at making earrings.

The other day when my sister and I spent an afternoon running around and playing in downtown Austin, I mentioned that we stopped into a bead shop (Bead It on South Lamar).  Over the years, I have assembled a nice set of jewelry-making tools that I use to repair miscellaneous of my favorite purchased pieces that have broken.  I’ve always wanted to try my hand at making earrings, bracelets, necklaces, etc, but have never taken that step.

So, when I came home last week with several baggies of beads and earring posts & hangers, I was excited to make a few pairs.   These are my very first pieces.   Not bad, i think.   Hmmmm, could there be an etsy storefront in my future?    🙂

P.s.  I’m wearing the purple/amethyst ones as I’m posting this…